Table of Contents
- 2.1. Introduction
- 2.2. Using Bonjour™ on Windows™
- 2.3. Connecting Meteo-40 via Ethernet to your LAN
- 2.4. Connecting Meteo-40 to your Windows 7™, Windows 10™ PC via point-to-point Ethernet connection
- 2.5. Connecting Meteo-40 with your Windows 7™, Windows Vista™ or Windows XP™ PC via USB
- 2.6. Connecting Meteo-40 to your Windows 8™ PC via USB
- 2.7. Using Meteo-40 with Linux
Before you start working with Meteo-40, connect the data logger to the power supply. In the moment Meteo-40 is connected to the power supply, the lower LED lights turn on and indicate that the Measurement And Recording System ( MARS) is booting. Both LEDs turn off, when MARS has successfully started and is running. To access the web interface, the second system Configuration, Evaluation and Communication System ( CECS) has to be started. Press the middle button of Meteo-40's keyboard and hold it until the display turns on (see Section 1.4, “The Two Systems of Meteo-40”).
In order to access the web interface, it is necessary to establish a TCP/IP connection between Host PC and Meteo-40. There are multiple ways to create this connection:
If you connect the data logger to your LAN using an Ethernet cable (see Section 2.3, “Connecting Meteo-40 via Ethernet to your LAN”) and DHCP method, any other device in the lan (e.g. your PC) will have access to the web interface of the data logger, as long as the CECS is running.
Figure 2.1. Accessing Meteo-40 via LAN (see Section 2.3, “Connecting Meteo-40 via Ethernet to your LAN”)
A direct, point-to-point connection using an Ethernet cable (see Section 2.4, “Connecting Meteo-40 to your Windows 7™, Windows 10™ PC via point-to-point Ethernet connection”), either with the
link-localmethod or with static IP addresses. Thelink-localmethod is recommended.Figure 2.2. Accessing Meteo-40 via Point-to-Point Ethernet Connection (see Section 2.4, “Connecting Meteo-40 to your Windows 7™, Windows 10™ PC via point-to-point Ethernet connection”)
A direct, point-to-point connection using a standard USB 2.0 A/B cable, (see Section 2.5, “Connecting Meteo-40 with your Windows 7™, Windows Vista™ or Windows XP™ PC via USB”). The same type of cable is typically used to connect a USB printer to a PC.
Figure 2.3. Accessing Meteo-40 via USB-B(see Section 2.5, “Connecting Meteo-40 with your Windows 7™, Windows Vista™ or Windows XP™ PC via USB”)
![[Important]](admon/important.png)
Important If you establish a connection via USB, a driver file might be needed for Windows PCs. The driver file can be downloaded from the Ammonit website in the + → section. For further details refer to Section 2.5, “Connecting Meteo-40 with your Windows 7™, Windows Vista™ or Windows XP™ PC via USB”.
![[Note]](admon/note.png) | Note |
|---|---|
If you are working with Meteo-40 Revision C with RS232 slot, you need an USB Ethernet adapter to connect the data logger to your LAN or via Ethernet to your PC (Point-to-Point). The production of Meteo-40 Revision C stopped in October 2012. |
| Note |
|---|---|
After having configured Meteo-40 for W-LAN, the data logger web interface can be accessed by using a W-LAN USB device (see Section 7.8, “Configuring W-LAN”). |

![[Tip]](admon/tip.png) | Tip |
|---|---|
We recommend connecting Meteo-40 via Ethernet to your LAN. It is the easiest method, no additional driver file is needed and updates can be performed immediately. |
For Windows Vista™ and later versions, this procedure can be simplified by installing the software Bonjour Print Services for Windows from Apple. It provides automatic resolution of computer host names and the data logger can be accessed via its serial number. Unfortunately, our tests have revealed that this software can cause problems when installed on Windows XP.
![[Warning]](admon/warning.png) | Warning |
|---|---|
Do not use Bonjour with Windows XP™, as it might cause communication problems! |
After the installation of Bonjour Print Services just type the serial number as
follows in your web browser
https://Dnnnnnn.local with
Dnnnnnn as your data loggers serial number. The untrusted
connection alert page will appear and should be accepted as described in
Section 2.5.1, “Standard
RNDIS
USB Driver”.

In order to connect Meteo-40 with your PC via Ethernet, both devices have to be connected to your local network. Your computer should be connected via LAN or W-LAN to your network. To connect Meteo-40 to the network, a standard Ethernet cable is needed. If you have only one Ethernet port in your office, use a switch or a hub to multiply the available Ethernet ports. See Figure 2.1, “Accessing Meteo-40 via LAN (see Section 2.3, “Connecting Meteo-40 via Ethernet to your LAN”)”.
| Note |
|---|---|
If you are working with Meteo-40 Revision C with RS232 slot, you need an USB Ethernet adapter to connect the data logger to the LAN. Connect the USB side of the adapter to the data logger and plug in the Ethernet cable on the other side. The production of Meteo-40 Revision C stopped in October 2012. |
To see that Meteo-40 has been connected successfully, use the buttons on the data
logger to navigate through the menu. In the
→ → menu you can find a list of connections, which displays all available
connections. If
eth Activated is displayed, the connection has been successfully
established.
By opening this menu item (click on the right button of the data logger keyboard),
you can browse for the connection properties such as IP address, which was automatically
assigned to the data logger by DHCP server. To access the web interface, start your web
browser. Enter
https:// and the IP address shown in the data logger display, e.g.,
https://192.168.12.30.
| Tip |
|---|---|
We recommend using Mozilla Firefox as your web browser to access Meteo-40. Other modern web browsers, including mobile web browsers, should work as well, but are not systematically tested by Ammonit. |
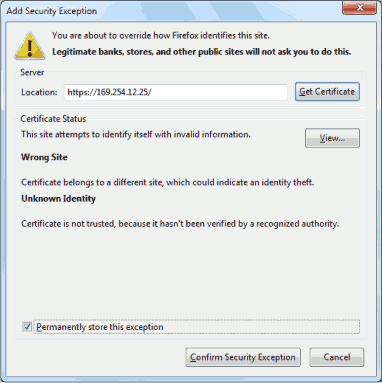
After entering the address in your web browser, a confirmation prompt may appear. Click I understand the risks and press Add Exception.
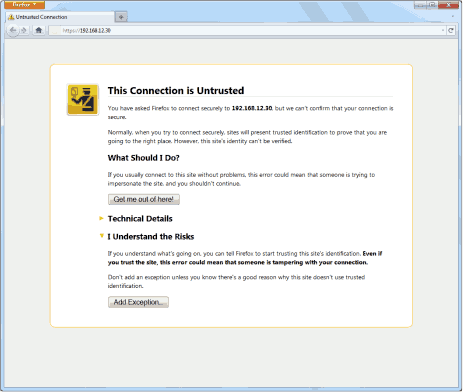
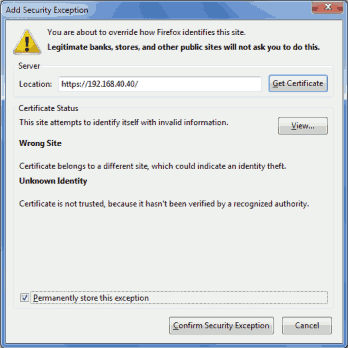
In the next step download the certificate by clicking on Get Certificate and Confirm Security Exception to access the Meteo-40 web interface. In order to save the exception Permanently store this exception should be checked.
| Important |
|---|---|
In order to prevent misuse of the certificate, Ammonit deliberately did not store the security certificate on each data logger. After downloading the certificate, its validity can be verified. |

| Important |
|---|---|
In order to use all functions of the web interface, activate JavaScript and Cookies in your web browser! |
Go to Chapter 3, Login at Meteo-40 to proceed with the configuration.
In order to connect Meteo-40 with your Windows 7™ PC, an Ethernet cable is required. No additional driver file is needed for a direct point-to-point connection via Ethernet. See Figure 2.2, “Accessing Meteo-40 via Point-to-Point Ethernet Connection (see Section 2.4, “Connecting Meteo-40 to your Windows 7™, Windows 10™ PC via point-to-point Ethernet connection”)”.
| Note |
|---|---|
If you are working with Meteo-40 Revision C with RS232 slot, you need an USB Ethernet adapter to connect the data logger via point-to-point Ethernet connection to your PC. Connect the USB side of the adapter to the data logger and plug in the Ethernet cable on the other side. The production of Meteo-40 Revision C stopped in 2012. |
Before you connect the devices, Meteo-40 has to be configured to use either a link-local connection or a static IP address. The former is much easier to use, because it does not involve any manual configuration of the PC, if it has the standard configuration of obtaining an IP address automatically.
To use a link-local address, you have to make sure your PC is configured to obtain an IP address automatically. In most cases, this is already be the case.
In the next step Meteo-40 has to be configured for the link-local Ethernet
connection. Open the
→ → → menu and select
Ethernet (Offline). Move to
Method and press the right button on the Meteo-40 keyboard until
Link-local is displayed as shown in
Figure 2.9, “Meteo-40 display with activated link-local connection”.
DHCP is configured by default to support the standard LAN (see
Section 2.3, “Connecting Meteo-40 via Ethernet to your LAN”) connection via Ethernet.
Figure 2.9. Meteo-40 display with activated link-local connection
                  IP / Netmask
  DNS Servers
  Routes
> Method: Link-local
Open your browser, e.g., Mozilla Firefox. When you are using a Mac or a Linux
computer, or when you have installed
Bonjour on a Windows PC, you can just enter
https://Dnnnnnn.local in the URL field of your web browser.
Otherwise, look up the IP number in the menu and enter the number as follows
https://169.254.nnn.nnn as URL. For
link-local connection, IP addresses start always with
169.254., while the remaining numbers are random and change every
time.
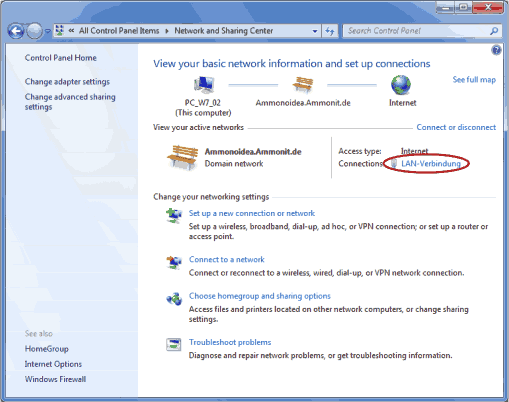
To use a static IP address, you need to configure your PC and Meteo-40. To configure the PC, open the Network and Sharing Center in the Control Panel of your computer and click on LAN Connection(see Figure 2.10, “Network and Sharing Center of Windows 7™”). In most cases, the link-local connection Section 2.4.1, “Using link-local connection” is preferable.
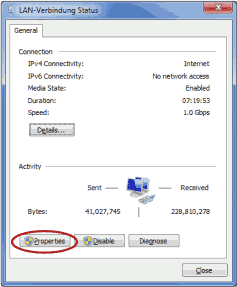
To configure the LAN connection, click on Properties( Figure 2.11, “LAN Connection Status”) in the LAN Connection Status window.
Select Internet Protocol Version 4 (TCP/IPv4) and open the Properties of the Internet protocol as shown in Figure 2.12, “Properties of LAN Connection”
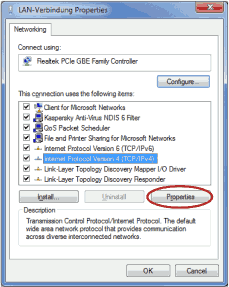
Choose
Use the following IP address and enter the following IP address
192.168.40.1 as shown in
Figure 2.13, “Properties of Internet Protocol”. By pressing the
TAB button the Subnet mask will be filled automatically. Save the
configuration with
OK.
| Important |
|---|---|
If you do not have the rights to configure the settings, contact your system administrator. |

After having configured the LAN connection, connect your PC with Meteo-40 using a standard Ethernet cable. Switch on Meteo-40 by pressing the middle button of the keyboard.
In the next step Meteo-40 has to be configured for the static IP point-to-point
Ethernet connection. Open the
→ → → menu and select
Ethernet (Offline). Move to
Method and press the right button on the Meteo-40 keyboard until
Static IP is displayed.
Figure 2.14. Meteo-40 display with activated link-local connection
                  IP / Netmask
  DNS Servers
  Routes
> Method: Link-local
Open your browser, e.g., Mozilla Firefox. When you are using a Mac or a Linux
computer, or when you have installed
Bonjour on a Windows PC, you can just enter
https://Dnnnnnn.local in the URL field of your web browser.
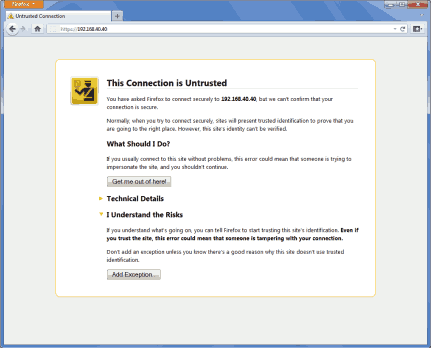
Otherwise, just enter
https://192.168.40.40, where 192.168.40.40 is the preconfigured IP
address of each Meteo-40 data logger.
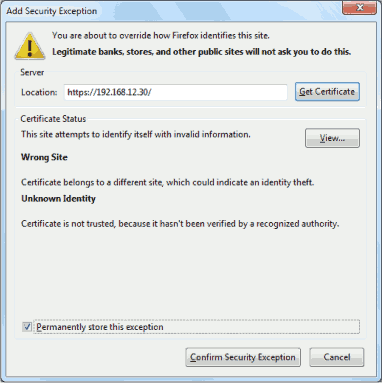
Afterwards a confirmation prompt appears. Click I understand the risks and press Add Exception as shown in Figure 2.15, “Mozilla Firefox Connection Untrusted Alert Page”.
In the next step download the certificate by clicking on Get Certificate and Confirm Security Exception to access the Meteo-40 web interface. In order to save the exception, Permanently store this exception should be checked.
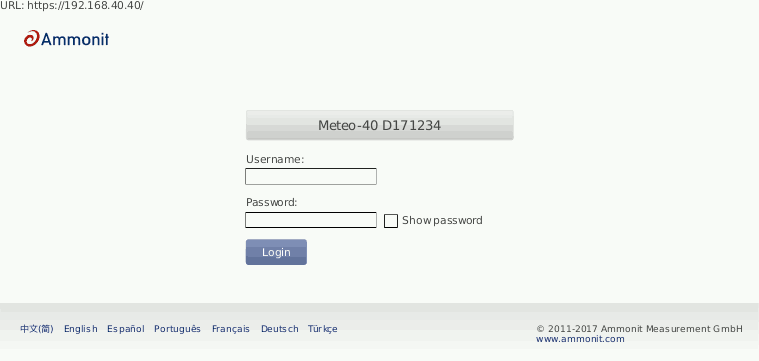
After confirming the certificate, the Meteo-40 login page is shown. Use your login details (Meteo-40 certificate) to enter the web interface. To proceed with the configuration, go to Chapter 3, Login at Meteo-40.
| Tip |
|---|---|
By using this point-to-point connection (without Internet access), the modem connection can be tested, e.g., sending emails via modem. |
| Note |
|---|---|
Do not forget resetting the LAN configuration on your PC (Internet protocol properties) and enabling DHCP on Meteo-40 (if needed). |
Meteo-40 requires a standard RNDIS USB driver from Microsoft™ Corporation. With the driver, it should be automatically recognized and installed. If any incompatibility problems occur, refer to Section 2.5.2, “Driver Update”. Otherwise proceed to Section 2.5.1, “Standard RNDIS USB Driver”.
| Tip |
|---|---|
You can also connect Meteo-40 to your tablet PC or smartphone by using a micro USB cable as shown in Figure 2.3, “ Accessing Meteo-40 via USB-B(see Section 2.5, “Connecting Meteo-40 with your Windows 7™, Windows Vista™ or Windows XP™ PC via USB”)”. In doing so, you can easily connect to the data logger for maintenance reasons in the field or for performing updates using the tethering function of your mobile device (see also Section 4.3.1, “Upgrade using a Smartphone”). |
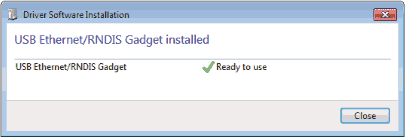
Start Meteo-40 and connect the USB-B side of the cable to the data logger and the USB-A to the computer. Windows will find the new hardware and will automatically search for appropriate software. After a few seconds the USB Ethernet/ RNDIS Gadget is installed and ready to use.
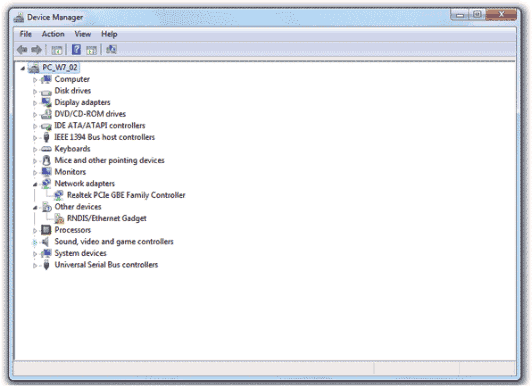
If the installation does not start automatically, open the Device Manager, right click on the device, select Update Drivers and Search automatically for updated driver software. Access to the Internet is required for this step.
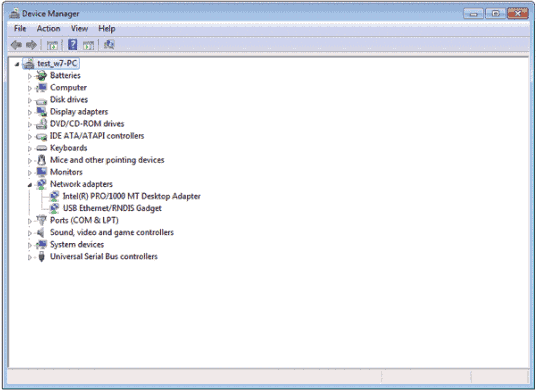
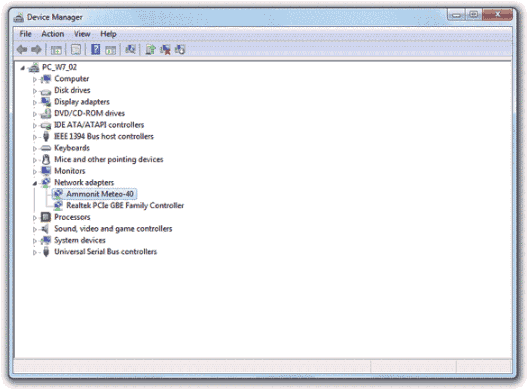
Once the software installation is completed, a new RNDIS/Ethernet Gadget device will appear on the Network adapters list in the Device Manager.
The local connection is established. An IP address is automatically assigned to the
data logger, which can be found on its display in the menu
→ → → under IP/Netmask. To start using Meteo-40, type the address in your web
browser, e.g.,
https://169.254.12.25/. The address always starts with
169.254, the remaining part is random.
| Tip |
|---|---|
We recommend using Mozilla Firefox as your web browser to access Meteo-40. Other modern web browsers, including mobile web browsers, should work as well, but are not systematically tested by Ammonit. |
| Important |
|---|---|
In order to use all functions of the web interface, activate JavaScript and Cookies in your web browser! |
After entering the address in your web browser, a confirmation prompt may appear. Click I understand the risks and press Add Exception.
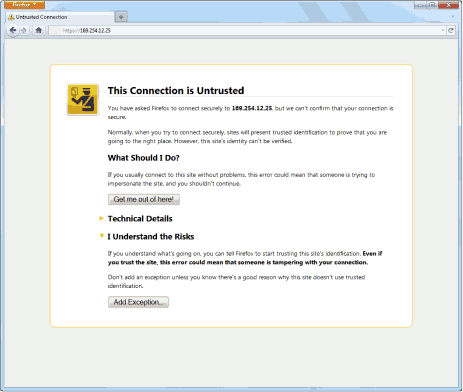
In the next step download the certificate by clicking on Get Certificate and Confirm Security Exception to access the Meteo-40 web interface. In order to save the exception, Permanently store this exception should be checked.
| Important |
|---|---|
In order to prevent misuse of the certificate, Ammonit deliberately did not store the security certificate on each data logger. After downloading the certificate, its validity can be verified. |

When installing Meteo-40 for the first time, driver incompatibility problems may occur. A new RNDIS/Ethernet Gadget device should appear in the Device Manager under Network Adapters, but a warning sign (⚠) indicates that the hardware driver software was not correctly installed.
In this case download the driver file from the Ammonit website. Therefore, go to http://www.ammonit.com/, open the Support page and browse to the software section under Downloads. After downloading the Meteo-40 driver file, extract the ZIP file and save the Meteo-40.inf file on your PC.
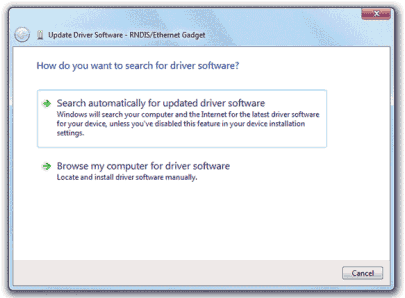
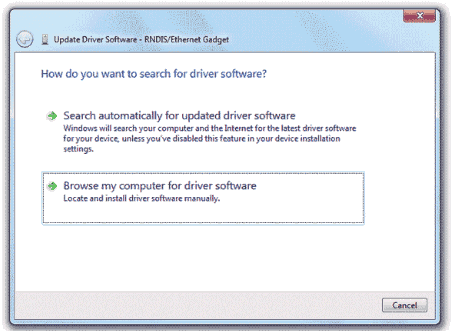
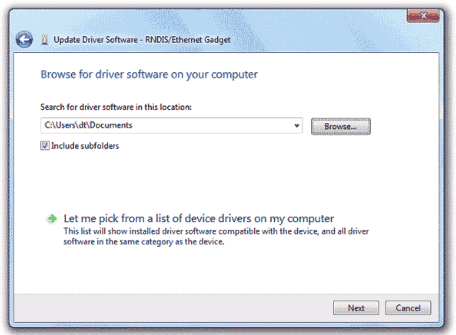
Right click on the device and select Update Driver Software.... An update wizard opens. Click on Browse my computer for driver software.
Locate and select the Meteo-40.inf file, which has been downloaded from the Ammonit website to your PC.
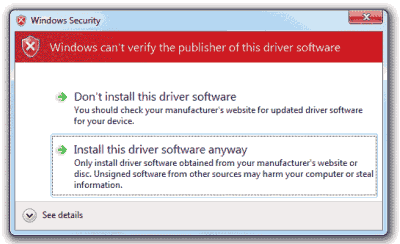
| Note |
|---|---|
During the installation of the drivers, Windows may show a warning message: "Windows can't verify the publisher of this driver software". If this happens, select "Install this driver software anyway" to complete the installation. |
The driver software for Meteo-40 should now be correctly installed. The warning sign (⚠) should have gone and the name of the device in the Hardware Manager should have changed from RNDIS/Ethernet Gadget to Ammonit Meteo-40.
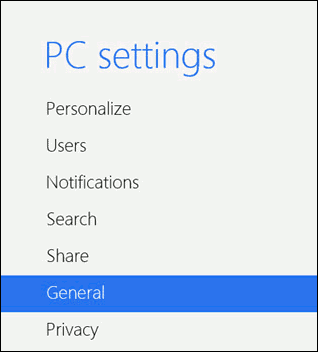
In order to connect Meteo-40 to a Windows 8™ PC, some PC settings have to be modified. Unlike its predecessor Windows 7, Windows 8 strictly enforces a driver signature check - verifying the signatures with its own local database. If your PC is not configured to install unsigned driver files, the installation of Meteo-40 will fail. The problem can be solved by disabling a checkbox in the PC settings in a few steps:
Open the PC settings in the Charms bar for example by pressing the "Windows" key + "C" on the keyboard. Click on General.
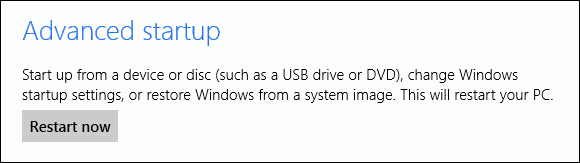
Select Advanced startup and click on Restart now.
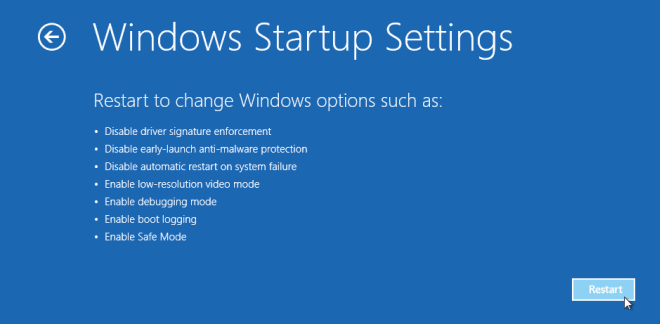
Go to Troubleshoot and click on Advanced options. Select Startup Settings.
The Windows Startup Settings are displayed. The first option is Disable driver signature enforcement. In order to disable this feature, click on Restart. After reboot, press F7 to modify the settings. Thereafter the Meteo-40 driver file should be installed properly.

After having configured the settings of your Windows 8™ PC, the Meteo-40 driver file has to be installed. To do so, follow the instructions in Section 2.5.2, “Driver Update”.
Recommended is any up-to-date Linux distribution with installed Network Manager(at least version 0.8), such as Debian 6.0, Ubuntu 10.04 or later. Configure the RNDIS/Ethernet Gadget to use link-local and connect the Meteo-40 with the PC. You should be able to access the Meteo-40 with your web browser now.