Chapter 8. Archiving
Table of Contents
In the Archiving section data files can be managed. You can show, configure, import or export the data.
8.1. Data Logger Files
The imported data files can be accessed in the → menu. All data files for the project are sorted by the file date in descending order. Other sorting options are avaliable by clicking the headers of the columns. AmmonitOR displays file size, first and last entry and the start data of the configuration as well as when and how the data has been uploaded.
The data upload is a basic feature. Some devices and data is restricted from import. Means this certain data has to be enabled first. All unrestricted data will be automatically imported by default. For more details towards upload and import mechanics check out Section 8.3, “Import Data”.
AmmonitOR checks the validity of the file. If an data import fails a click on the detail view of a data file shows the reason why.
All data files can be downloaded compressed in ZIP format by clicking on Download all files (ZIP).
Click on a file name to preview its content. AmmonitOR displays the information about the file itself as well as information about the file in AmmonitOR.
The file content can be downloaded or displayed.
Figure 8.1. Data files
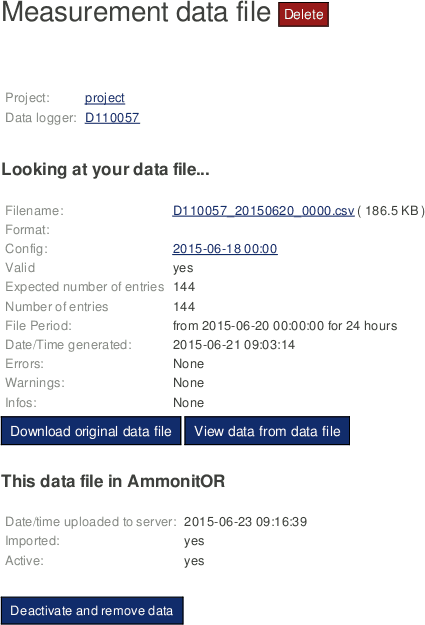 |
In order to view the configuration, which was active for the data file, click in the configuration ID in the raw data file list. The configuration can also be accessed by displaying the file content and clicking on the configuration ID in the section with the file characteristics.
In case data for a day has been imported twice, e.g. with different configurations, you can Deactivate and remove data of this file. The file is archived not deleted! If necessary, you can reimport the data file.
8.2. Data Logger Configurations
In the → menu, AmmonitOR lists all configurations of a data logger. The configurations are listed in ascending order - starting with the initial configuration.
AmmonitOR displays for all configurations start time and number of affected data files, as well as the changes, which have been made. Firmware upgrades are highlighted.
Figure 8.2. Data logger configuration
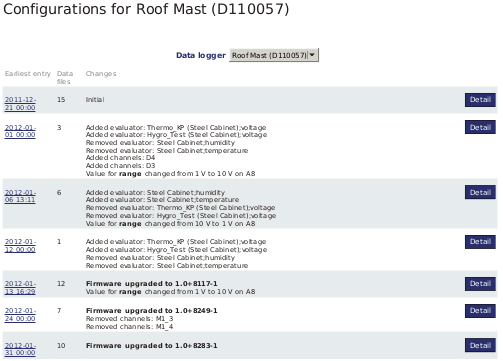
Click on an entry to display further details of the data logger configuration. First and last data set with the configuration is shown, as well as number of affected data files.
Figure 8.3. CSV file in AmmonitOR

- Configuration
General data logger information like name, timezone and firmware version as well as statistic and calibration details.
- Communication
Indicates the status of the communication options, e.g., CECS power mode switched on for SCADA operation.
- Evaluations
List of all sensors and evaluations including unit, formula, source/channel, defined statistics and entered parameters (slope, offset, sensitivity).
- Channels
Structured list of connected channels showing defined statistics, measurement rates and ranges as well as units and used protocols (digital channels).
- Data files
All CSV files, which have been generated with the configuration. Click on a file to open the content in AmmonitOR; download is also possible.
If data files related to a configuration have to be set inactive for some reasons, click on Unimport and archive all related data files. AmmonitOR deactivates the files for all views (plots, calendars etc.). The files are archived, not deleted.
8.3. Import Data
If your measurement data is not automatically transferred to AmmonitOR via email or via SCP file upload, you can upload files manually. To do so, open a project in AmmonitOR and click on Import data in the Archiving menu.
![[Note]](admon/note.png) | Note |
|---|---|
In the data file section the uploaded data files are always accessible even when they are not imported to the database. The file managment of AmmonitOR has two steps, first upload the data file, second import the data file to the database itself. All datafiles will be uploaded and are always download-able. Even when they are not imported to the database the data files are saved and backuped. To use any kind of inspection feature, plots, data export or generation of reports etc. the data has to be imported to the database. Restricted data imports depend on the device type or/and statistic interval. To enable data import for those devices and/or statistic intervals of data, data months have to be bought. The available data files will be imported to the database right after. (See restricted data import management in Chapter 3, Restricted data import management).. |
![[Important]](admon/important.png) | Important |
|---|---|
Already imported data will be expired after 2,5 years. The data files itself stay on the filesystem and can be downloaded anytime. If needed data can be re-imported. |
If more than one data logger has been assigned to the project, select the data
logger, whose data should be uploaded. If a Meteo-32 data logger is selected,
ROWINFO and
ROW files have to be uploaded. The
ROWINFO file has to be uploaded in the
Information file box;
ROW files in the
Data files box. For CSV files generated by Meteo-40, Meteo-40 Plus
and Meteo-42 data loggers, only the
Data files box is available. Click on
Browse to choose the files, which should be uploaded.
The upload immediately starts.
Press Import to perform the import process. This process can take some minutes.
| Important |
|---|---|
If the serial number of the selected data logger and the uploaded file do not match, AmmonitOR ignores the file and shows a message. |
| Note |
|---|---|
If you upload a file, which has been uploaded before, AmmonitOR ignores this file. |
In case your file got rejected you get more informations about the reason, if you go to data files and click on the related file. If something special occurs what is not leading to a rejection, it will be also listet there.
| Important |
|---|---|
Keep in mind that SODAR AQ510 text files are only allowed to import in the Classic format. |
8.4. Export Data
Exporting data can be very useful, when data should be analysed separately for a determined time period or data should correspond to a defined file format and structure, e.g., for Turkish or Brazilian authorities. AmmonitOR offers the possibility to export data in different file formats.
| Note |
|---|---|
In order to analyse data recorded by Meteo-32 data loggers with office software, the ROW files have to be converted. Use the data export function of AmmonitOR to create legible files. |
Go to the → menu to download, email or configure export files. AmmonitOR lists all available exports with file format, period and recipient information.
- Edit
Modify the configuration of the export
- Download/Send
Select, which export should be downloaded or send. See Figure 8.4, “Selecting the period for the data export”.
- Log
Click on Log to monitor, which export files have been sent via email. AmmonitOR displays a calendar overview and lists per subscribers all exports, which report has been sent successfully. The calendar is displayed in descending order with the current year on top. Missing reports can be send per year to each subscriber by clicking on Send all missing in one step. To send single missing export files, click on the export in the calendar and select the subscriber to send the file immediately.
Figure 8.4. Selecting the period for the data export
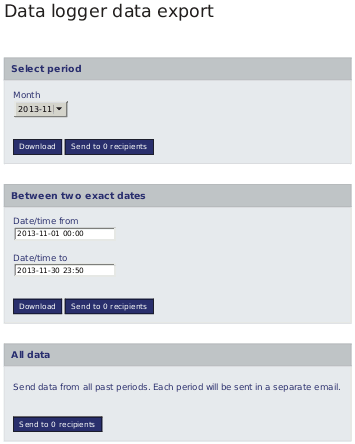
- Standard period
Depending on the defined period for the export, a year, quarter, month, week or day can be selected, from which the data should be included in the export file. The file can be downloaded or emailed.
- Between two exact dates
Select start and end date / time for the measurement data in the export file. The file can be downloaded or emailed to the configured recipient.
- All periods
Select this option to send all data from past periods. Each period is sent in a separate email. Download is not available for this option.
New exports are configured by clicking on New export. Go to Section 8.4.1, “Configuring export files”.
In order to delete an export configuration, select the configuration in the export list and click Edit. Scroll down and click Delete.
8.4.1. Configuring export files
Click on New export in the → menu to add a new export configuration. The export is configured step by step.
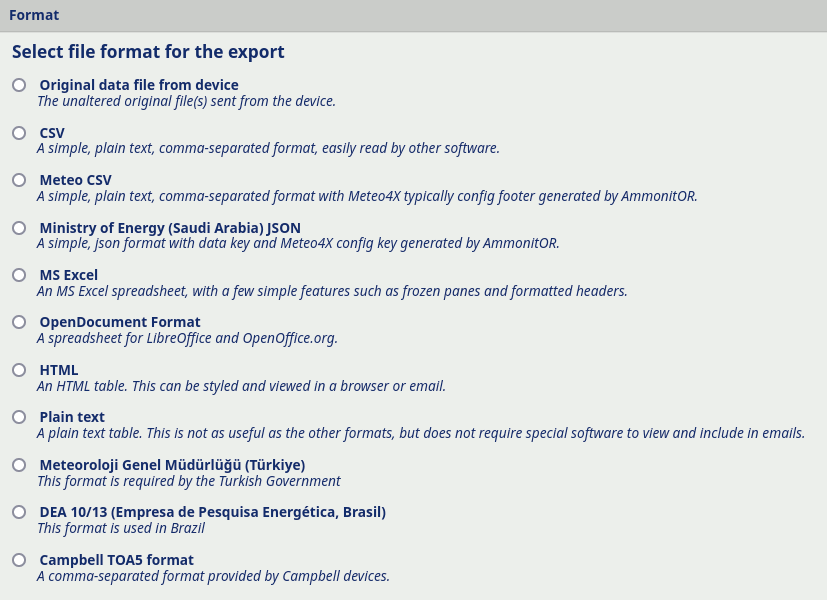
In the first step the export format has to be selected. AmmonitOR offers for example CSV, MS Excel and OpenDocument Format. For the Turkish and Brazilian market special configurations are available. After selecting the format, click on Continue go on with the configuration.
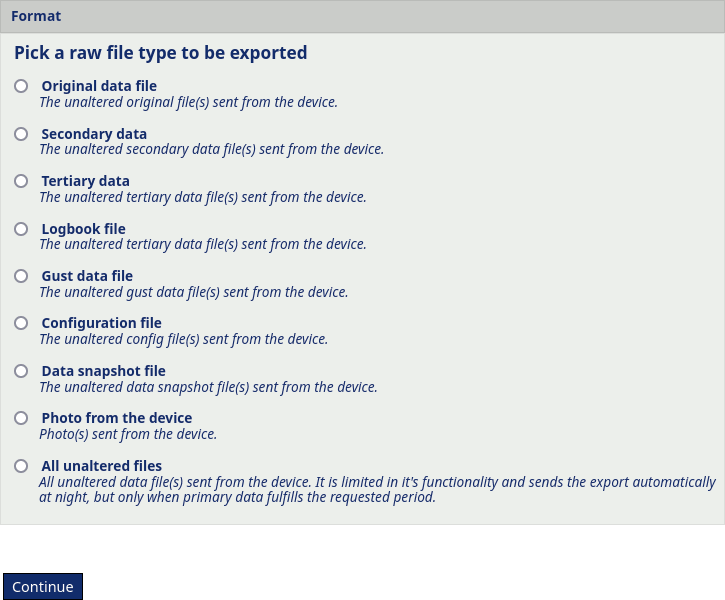
If unaltered original files sent from a data logger should be exported, select the first option Original data file from data logger.
Figure 8.5. Selecting the export file format
If unaltered original files are selected, another step is required, to select which type of files are to be exported. Possible selection is secondary, tertiary, logbook, gust, configuration and photo file. There is also a possibility of selecting the All unaltered files.
All unaltered files format sends all the avaliable raw data file types to you. This format has it's drawbacks. It is limited in it's functionality and it sends the export automatically at night and not right after the export period is fulfilled. It also uses the primary data as the decisive contition for the export sendout. It means, that not necessarily all the file types from that period will be delivered to you, if the logger had delays with sending the non-primary files.
Figure 8.6. Selecting the raw export file format
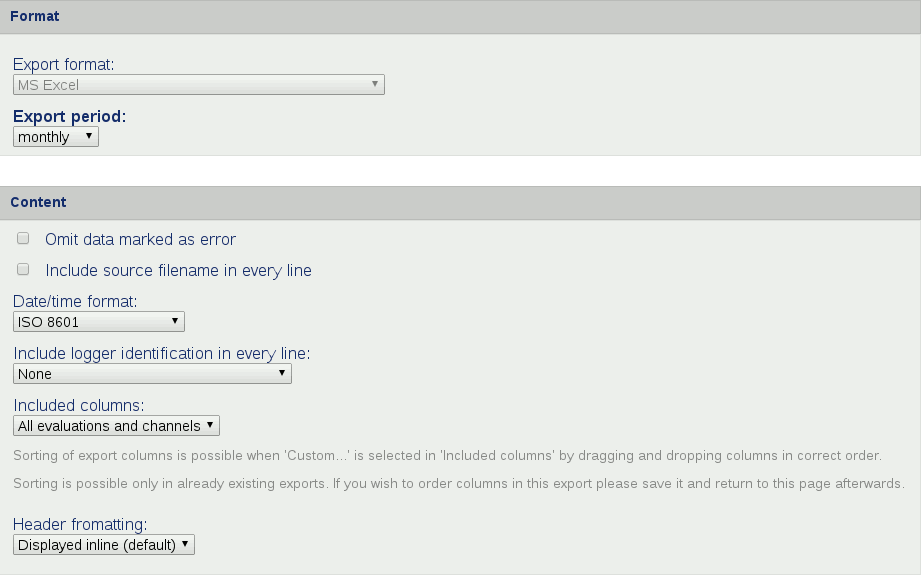
In the next step the file content has to be defined. Choose the period, which should be exported, e.g., monthly, weekly. When downloading or sending export files (see Section 8.4, “Export Data”), you can select the week, month or exact dates, which are included in the export file.
In the content box you can choose the date/time format used in the file, exclude error-related data, include further information in the file or change the header style.
Sorting of export columns is possible when Custom... is selected in Included columns by dragging and dropping columns in correct order. The order will be used in the export file. Sorting is possible only in already existing exports. If you wish to order columns in this export please save it and return to this page afterwards.
Figure 8.7. Configuring the content of the export file
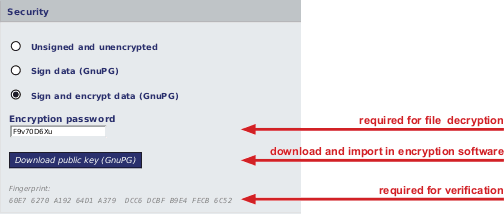
In order to digitally sign and encrypt the export file, tick the checkbox in the security box. The displayed password is required to open and decrypt the file. The digital signature of the file has to be verified by downloading the Public key. Refer to Section 8.4.2, “Signing and encrypting export files for Windows™ users” and Chapter 12, Security for further details.
Afterwards the email recipients of the export file can be determined. AmmonitOR lists all project users. Additional email addresses can be added in the Custom email addresses field. Enter the email addresses line by line or use commas to separate the addresses.
Finally the export email subject needs to be specified. AmmonitOR sends emails giving them default subject containing Project name, data logger name, export format. From the dropdown list the other options are avaliable.
Figure 8.8. Setting export recipents and email subject
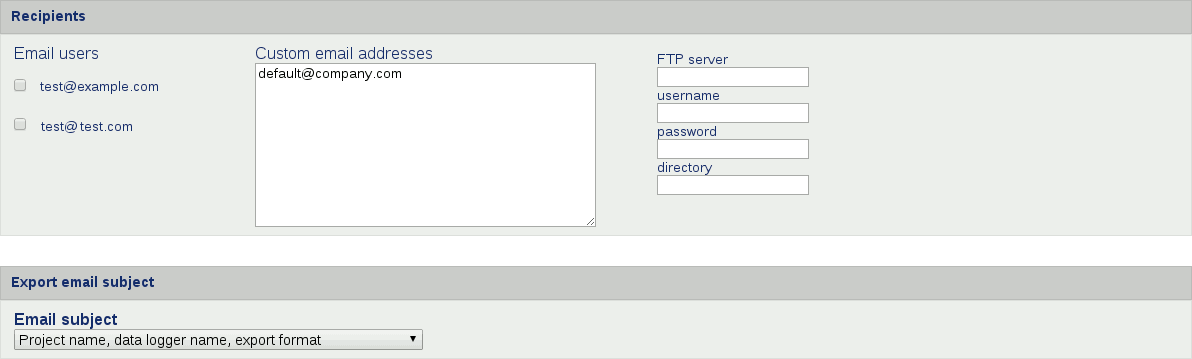
Files can be uploaded to an FTP server. Enter the required details into the dedicated fields, i.e. server, username, password and directory.
Files can also be uploaded to server via SCP. Enter the required details into the dedicated fields, i.e. server, username, password and directory. Download a AmmonitOR server public key from data export view and copy its contents as a new line to your authorized keys file (it is usually under~/.ssh/authorized_keys). You will receive your files via SCP from AmmonitOR then!
8.4.2. Signing and encrypting export files for Windows™ users
Encryption is a very complex topic. Using the encryption in AmmonitOR, you can encode data files in a way that third parties cannot read the file, only authorized parties are allowed to open and read the files.
Read this section carefully and follow our description step by step to avoid any misunderstanding. For further details about digital signature and encryption, refer to Chapter 12, Security.
AmmonitOR integrates GnuPG, which is a free software to encrypt data files. GnuPG is based on the international standard OpenPGP. Refer to Wikipedia or GnuPG website for further details.
In order to open and read files, which have been encrypted by AmmonitOR, additional software is necessary. We recommend installing GPG4win (GNU Privacy Guard for Windows). Ggp4win enables users to sign and encrypt as well as decrypt email and attachments as well as files in the directory. The software consists of several components:
GnuPG: encryption tool
Kleopatra: certificate manager for OpenPGP
GpgOL: add-in for Microsoft Outlook 2003/2007/2010/2013™ for email encryption
GpgEx: plug-in for Microsoft Explorer™ for file encryption
Gpg4win Compendium: documentation for beginners and advanced users
Go to the GPG4WiN website and download the current software version. Install the software with the above mentioned components.
If you work with Microsoft Outlook™, the program has to be restarted to implement the GpgOL add-in as separate ribbon.
Before decrypting files, Gpg4win has to be configured. Download the public key from AmmonitOR.
Figure 8.9. Downloading the public key
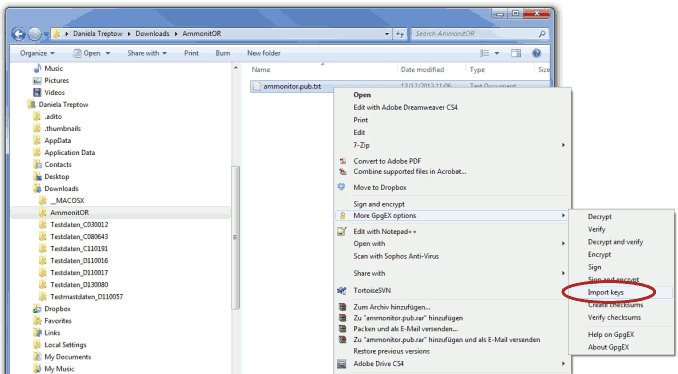
Import the public key in Gpg4win.
Figure 8.10. Importing the public key
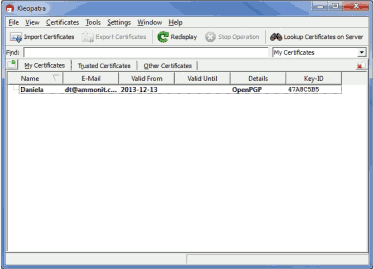
AmmonitOR's public key has to be certified by your own key. Open the Kleopatra software and create a new certificate via the → menu. Select Create a personal OpenPGP key pair and enter the required details. Click Create Key and enter a high quality passphase. The key pair should be successfully created.
Figure 8.11. Creating the private key
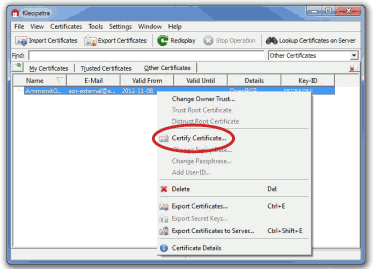
The public key from AmmonitOR has to be certified.
Figure 8.12. Certifying the public key
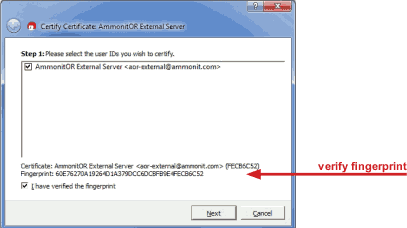
Check the displayed fingerprint with the one shown in AmmonitOR!
Figure 8.13. Verifying the fingerprint
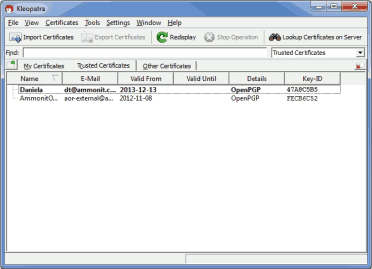
Finally the passphrase entered for the private key has to be entered, to unlock the private key for the GnuPG certificate. Both certificates are displayed under Trusted Certificates.
Figure 8.14. Trusted certificates
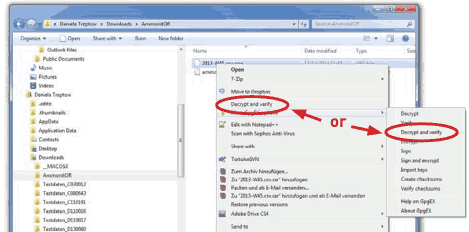
8.4.2.1. Decrypting data files in the Windows Explorer™
Encrypted files can be decrypted in the Windows Explorer™. Right click on the file and select Decrypt and verify.
Figure 8.15. Decrypt file in Windows Explorer™
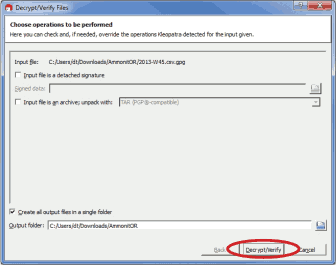
Start the decryption process by clicking Decrypt and verify.
Figure 8.16. Start decryption process
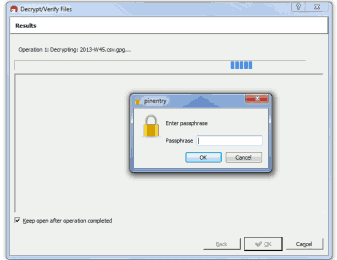
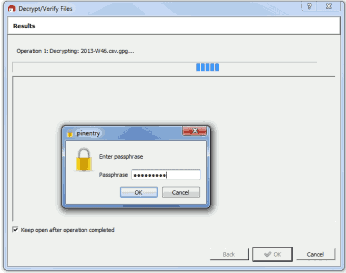
Enter the password for file encryption shown in AmmonitOR ( Figure 8.9, “Downloading the public key”).
Figure 8.17. Enter file encryption password
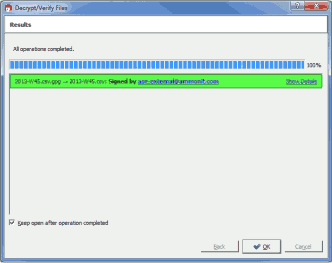
After successful decryption the file is displayed in the initial folder or the one selected in the decryption process.
Figure 8.18. Successful decryption
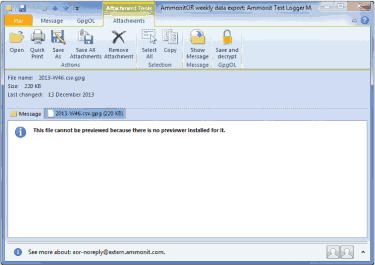
8.4.2.2. Decrypting data files in Microsoft Outlook™
After installing Gpg4win a new ribbon GpgOL should be shown in your Outlook™ application. Follow our step by step guide to decrypt encoded data files sent by AmmonitOR.
Open the email item and go to the Attachments ribbon. Click on Save and decrypt.
Figure 8.19. Decrypting files sent by email
| Note |
|---|---|
Only the attached data file is encrypted - not the email message. Decrypting the email message does not work! The attached file has to be selected and decrypted. |
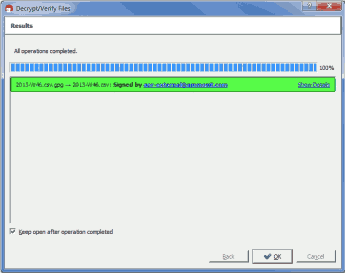
Select the folder, in which the files should be saved and start the decryption process. Enter the passphrase for file encryption shown in AmmonitOR.
Figure 8.20. Verifying the key pair
Both files encoded and decrypted data files should be successfully saved in the selected folder.
Figure 8.21. Successful decryption of data file
8.4.2.3. Export formats
| Note |
|---|---|
AmmonitOR data export function differs between data files who are directly exported without being altered by AmmonitOR and data files, who are generated with the data of AmmonitOR database. Data from database can be changed, e.g. by configuration overrides. |
- Original data file from device
Direct data export of the unaltered original data files sent by the data logger
- CSV
A simple, plain text, comma separated format. Easily read by 3rd party software. Contains data from the database. The content can be customized.
- Meteo CSV
A simple, plain text, comma separated format with an Meteo-40, Meteo-40 Plus or Meteo-42 config footer. The data is exported from database and can contain config overrides. This format is limited to daily period. If within one day the config changes multiple times, a data export file is generated for each of them. If config was not altered by user through AmmonitOR, the config footer is generated from the to the data related original data file.
For 3rd party devices the footer can also be generated and contains all the config information AmmonitOR knows about.
- MS Excel
An MS Excel spreadsheet, with a few simple features such as frozen panes and formatted headers. The content can be customized.
- Open document format
A spreadsheet for LibreOffice and OpenOffice.org. The content can be customized.
- HTML
An HTML table. This can be styled and viewed in a browser or email. The content can be customized.
- Plain text
A plain text table. This is not as useful as the other formats, but does not require special software to view and include in emails. The content can be customized.
- Meteoroloji Genel Müdürlüğü (Türkiye)
This format is required by the Turkish Government. The content can be customized.
- DEA 10/13 (Empresa de Pesquisa Energética, Brasil)
This format is used in Brazil. The content can be customized.
- Campbell TOA5 format
A comma-separated format provided by Campbell devices. The content can be customized.
- Ministry of Energy (Saudi Arabia) JSON
A
JSONformat required by the Ministry of Energy of Saudi Arabia. Included channels and evaluations can be selected.